Step 1 — Pick your system & download
Click your operating system, then download the installer. Use your work device whenever possible.
⚠️ The Windows and macOS installers download the full client during setup, so stay connected to the internet while installing.
Step 2 — Install
- Run the downloaded
FortiClientVPNInstaller.exe. If Windows asks for permission to make changes, click Yes. - Accept the license agreement and click through the installer with the default options.
- Wait for the installer to download and install the full client, then restart your computer if prompted.
- Open the downloaded
.dmgfile and double-click the installer inside. - Follow the prompts and enter your Mac password when asked.
- If macOS shows a "System Extension Blocked" message, open System Settings → Privacy & Security and click Allow next to the FortiClient extension, then approve the VPN configuration prompt.
- Open a terminal and install the downloaded package:
sudo dnf install ~/Downloads/forticlient_vpn_*_x86_64.rpm - Launch FortiClient from your applications menu (or run
forticlient).
- Install FortiClient VPN by Fortinet from Google Play.
- Open the app and accept the permissions it requests — including the prompt to allow it to create VPN connections.
- Install FortiClient VPN by Fortinet from the App Store.
- Open the app and tap Allow when iOS asks to add VPN configurations (you may need to confirm with Face ID or your passcode).
Showing instructions for . Wrong system? Windows · macOS · Linux · Android · iPhone/iPad
Step 3 — Create the VPN connection
- Launch FortiClient VPN.
- Accept the disclaimer if shown, then click Configure VPN.
- At the top of the form, select IPsec VPN (not SSL-VPN).
- Fill in the form exactly as follows:
| VPN | IPsec VPN |
|---|---|
| Connection Name | PSM |
| Description | Perry Stone Ministries (optional) |
| Remote Gateway | remote.voe.org |
| Authentication Method | Pre-shared key |
| Authentication (XAuth) | Save login |
| Username | Your domain network username — the one you log in to your work computer with, not your email address |
| Enable Single Sign On (SSO) | Leave unchecked |
📱 On Android and iPhone/iPad, the FortiClient VPN app asks for these same values when you add an IPsec VPN connection — field names may differ slightly.
🔑 View the pre-shared key here — shown automatically on the VOE network; from home you'll sign in with your VOE network account first.
📷 Show me what the completed form looks like
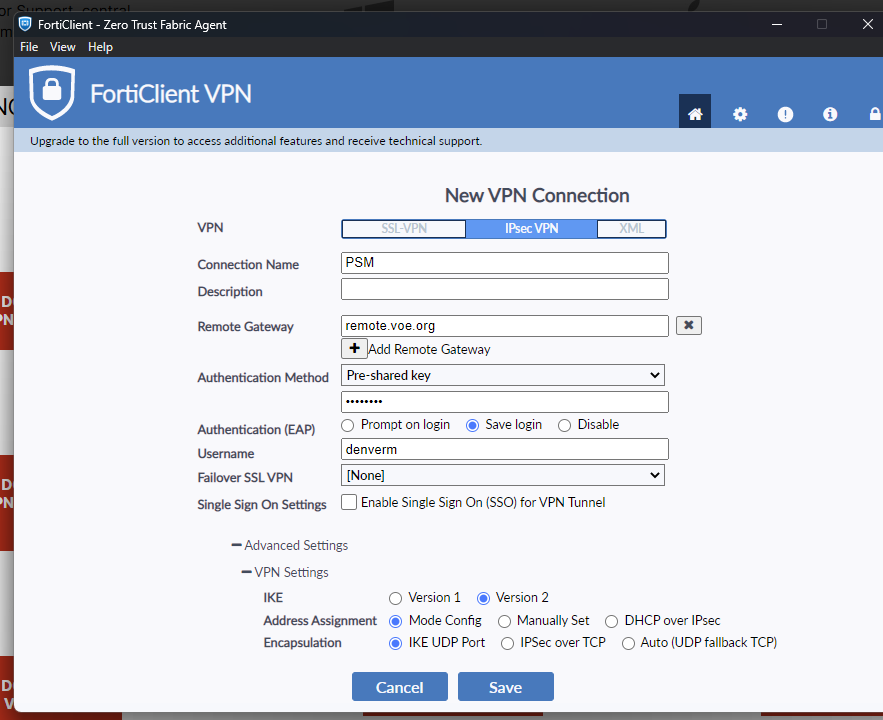
Don't click Save yet — the next step fills in the Advanced Settings.
Step 4 — Advanced settings
Still on the same form, expand Advanced Settings → VPN Settings. The VPN will not connect unless these match exactly.
| IKE | Version 2 |
|---|---|
| Address Assignment | Mode Config |
Phase 1
| IKE Proposal — row 1 | Encryption AES256GCM · Authentication PRFSHA384 |
|---|---|
| IKE Proposal — row 2 | Encryption AES256GCM · Authentication PRFSHA384 |
| DH Group | 20 only (uncheck all others) |
| Key Life | 86400 seconds |
| Local ID | (leave blank) |
| Dead Peer Detection | ✅ Checked |
| NAT Traversal | ✅ Checked (if shown) |
Phase 2
| IKE Proposal — row 1 | Encryption AES128GCM · Authentication NONE |
|---|---|
| IKE Proposal — row 2 | Encryption AES256GCM · Authentication NONE |
| Key Life | ✅ Seconds: 43200 · ⬜ KBytes: unchecked |
| Enable Replay Detection | ✅ Checked |
| Enable Perfect Forward Secrecy (PFS) | ✅ Checked |
| DH Group | 20 |
📷 Show me what this screen looks like
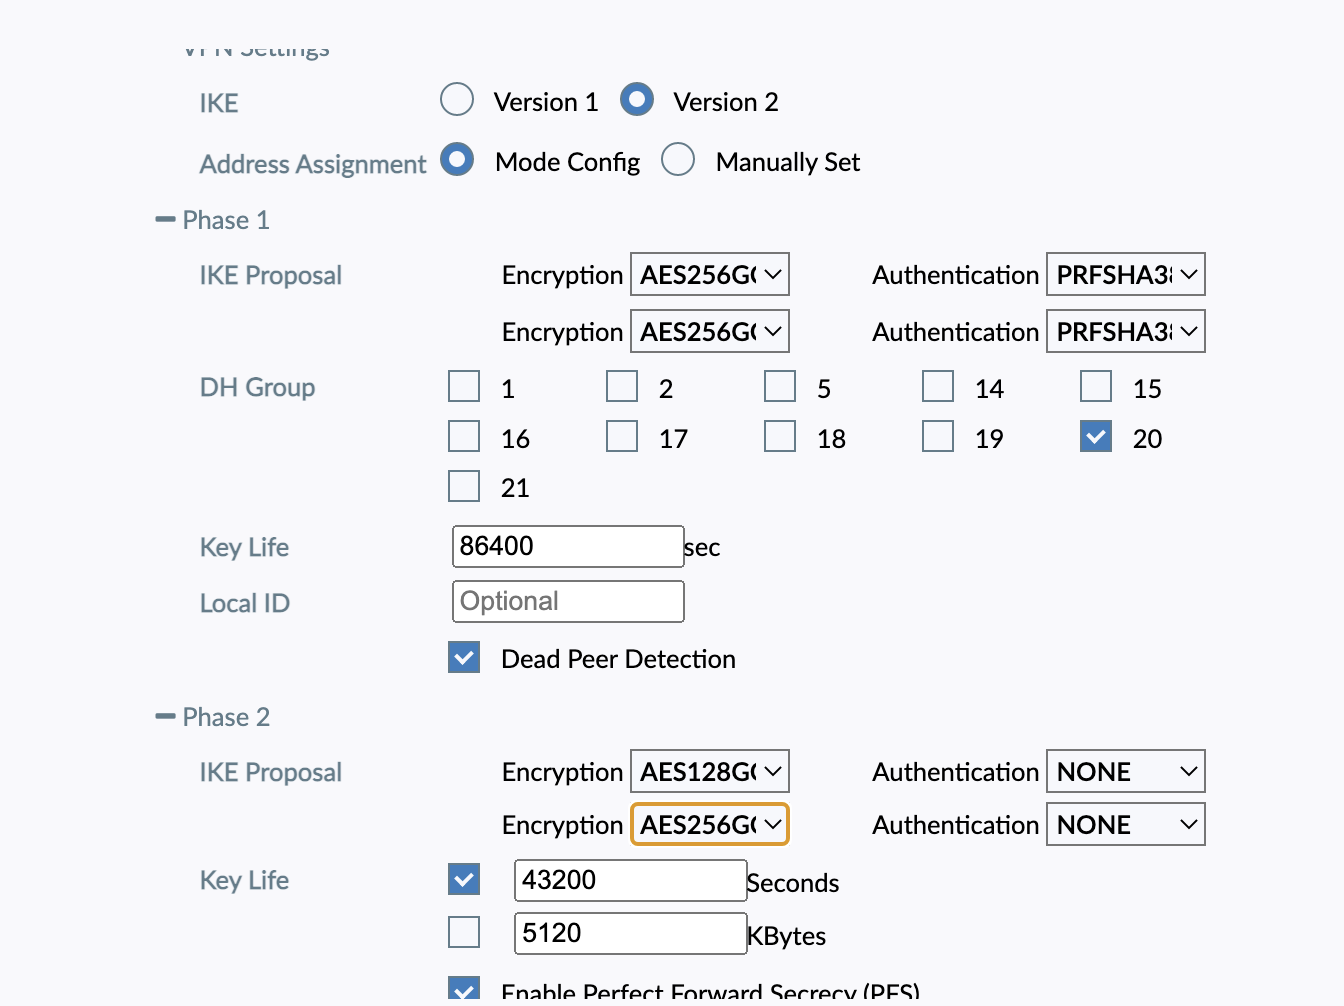
When everything matches, click Save.
Step 5 — Connect
- On the FortiClient home screen, make sure the PSM connection is selected in the VPN Name dropdown.
- Your username should already be filled in. Enter your VOE network password.
- Click Connect. The first connection may take 10–20 seconds.
- When connected, FortiClient shows the status, duration, and your assigned IP. You can now reach internal VOE resources as if you were in the office.
💡 To disconnect, open FortiClient and click Disconnect. Always disconnect when you finish working — especially on shared networks.
🎉 That's it — you're set up. Next time you just open FortiClient, type your password, and connect. If something didn't work, head to the Help step.
Help & troubleshooting
Getting the pre-shared key
View the pre-shared key here — it appears automatically if you're on the VOE network; otherwise sign in with your VOE network username and password. If you can't sign in, email it@voe.org from your VOE email account.
Common issues
"Unable to logon to the server" / wrong credentials
Re-enter your VOE network username and password. The username has no @voe.org suffix.
Stuck at "Connecting" then times out
Re-check every value in Steps 3 and 4 — a single mismatched proposal, DH group, or key-life value will silently fail. Also confirm the pre-shared key was typed correctly.
Connects then drops immediately
Verify Phase 2 settings, especially PFS, DH Group 20, and key life 43200.
Hotel / public Wi-Fi blocks the VPN
Some networks block IPsec (UDP 500/4500). Try a phone hotspot to confirm, then contact IT.
macOS: VPN option missing after install
Allow the FortiClient system extension under System Settings → Privacy & Security, then reboot.
Still stuck? Email it@voe.org.